Navigation by Radar
Reading the picture, getting fixes, harbor approach, and special techniques. (Pub 1310 Ch.4)
1 · Radarscope interpretation — what the picture tells you
Land paints differently from water differently from ships. The interpretation problem is to look at a busy PPI and decide what each blob actually is. Pub 1310 Ch.4 spends much of its first half on this; the cardinal rules:
- Coastlines are not the chart's coastline. Radar paints the highest reflective surface in each direction. A low sandy beach behind a tall cliff paints the cliff; a low cape behind tall hills paints the hills. The radar's "shoreline" is the land contour at the height of the strongest reflector.
- Radar shadow. A high promontory blocks the beam from anything behind it. The picture there is blank not because nothing's there but because nothing returns. Your nav planning should anticipate which features will shadow which.
- Beam-width and pulse-length distortion. Targets paint slightly fatter than they are (beam width spreads them in bearing; pulse length stretches them in range). A 1-nm-wide island painted with a 2° beam at 5 nm range looks ~0.18 nm fatter than reality. Distortions are largest at long range.
- Target shape ≠ object shape. A buoy paints as a circular blob whose size depends on the radar settings, not the buoy. A long ship paints as a stretched arc. The radar tells you where, not what.
2 · Recognizing unwanted echoes
- Side-lobe echoes — every antenna has small side lobes; a very strong target (cliff, ship close-in) returns echoes through them and paints small ghost arcs at the same range. They disappear with reduced gain.
- Multiple-trip echoes — a target beyond the range scale's nominal max can still be detected on the next pulse cycle, painting at (true range − scale max). Switch range scales briefly: a real target moves with the scale change; a multiple-trip ghost jumps.
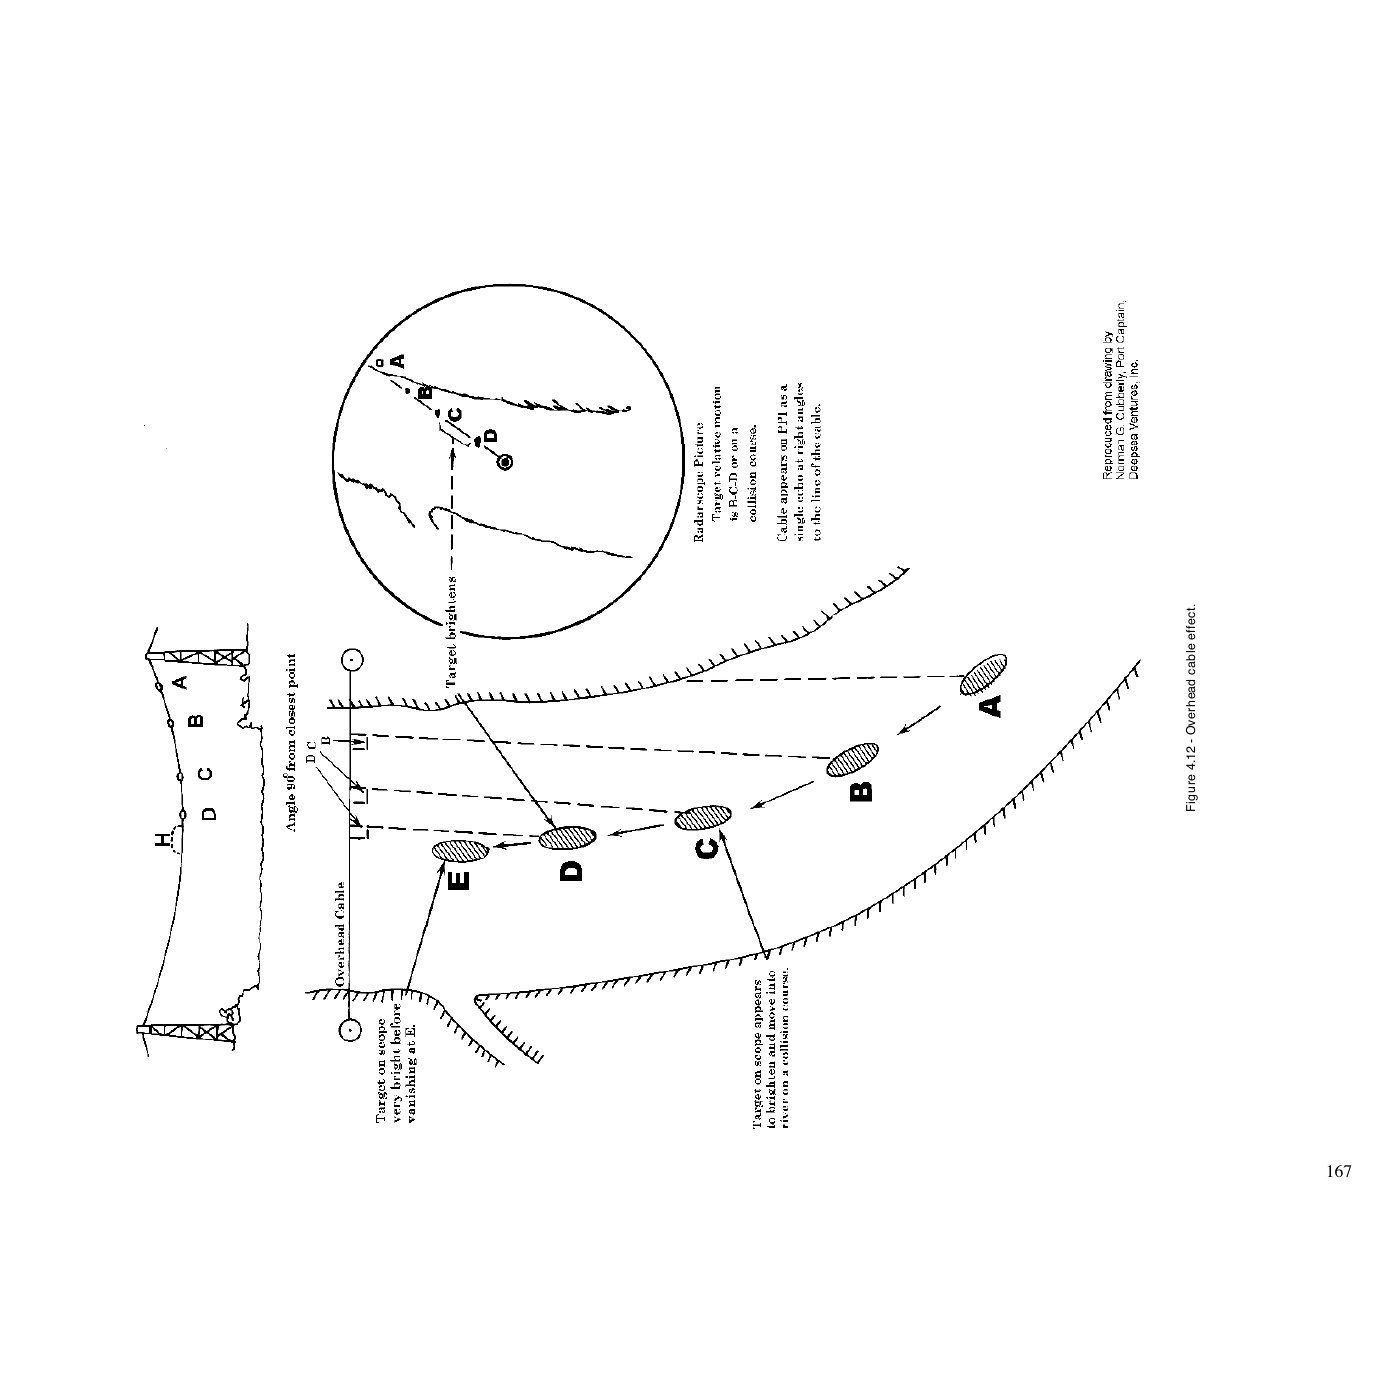
- Indirect echoes — beam reflected off your own mast or rigging back to a target and back via the same path. Paint at the same range as the real target but on a different bearing. Watch for them when transmitting in marinas.
- Interference — pulses from another radar on the same frequency (ships passing each other in clutter). Paints as radial lines or "feathers." Most modern sets have an interference-rejection filter.
3 · Radar reflectors and beacons
- Passive radar reflectors. Corner-cube structures (three perpendicular metal squares) return signal toward the transmitter regardless of incidence angle. A 12-inch corner cube can multiply a small craft's effective radar return by 100×. Standard inclusion in any cruising-boat outfit.
- RACON (Radar Beacon). A transponder-style beacon at major aids to navigation, lighthouses, or hazards. When triggered by your radar pulse, it transmits back a coded signal — typically a Morse character — that paints as a series of dots/dashes radiating outward from the RACON's position. Identifies the aid unambiguously.
- SART (Search and Rescue Transponder). Carried in life rafts; activates on your radar pulse and paints a 12-dot line on the bearing of the SART, dots equally spaced 0.6 nm apart. Pub 1310 mentions earlier transponders; SART is the modern equivalent (replaced earlier devices in the GMDSS era).
4 · Getting a fix
Five techniques, in rough order of accuracy:
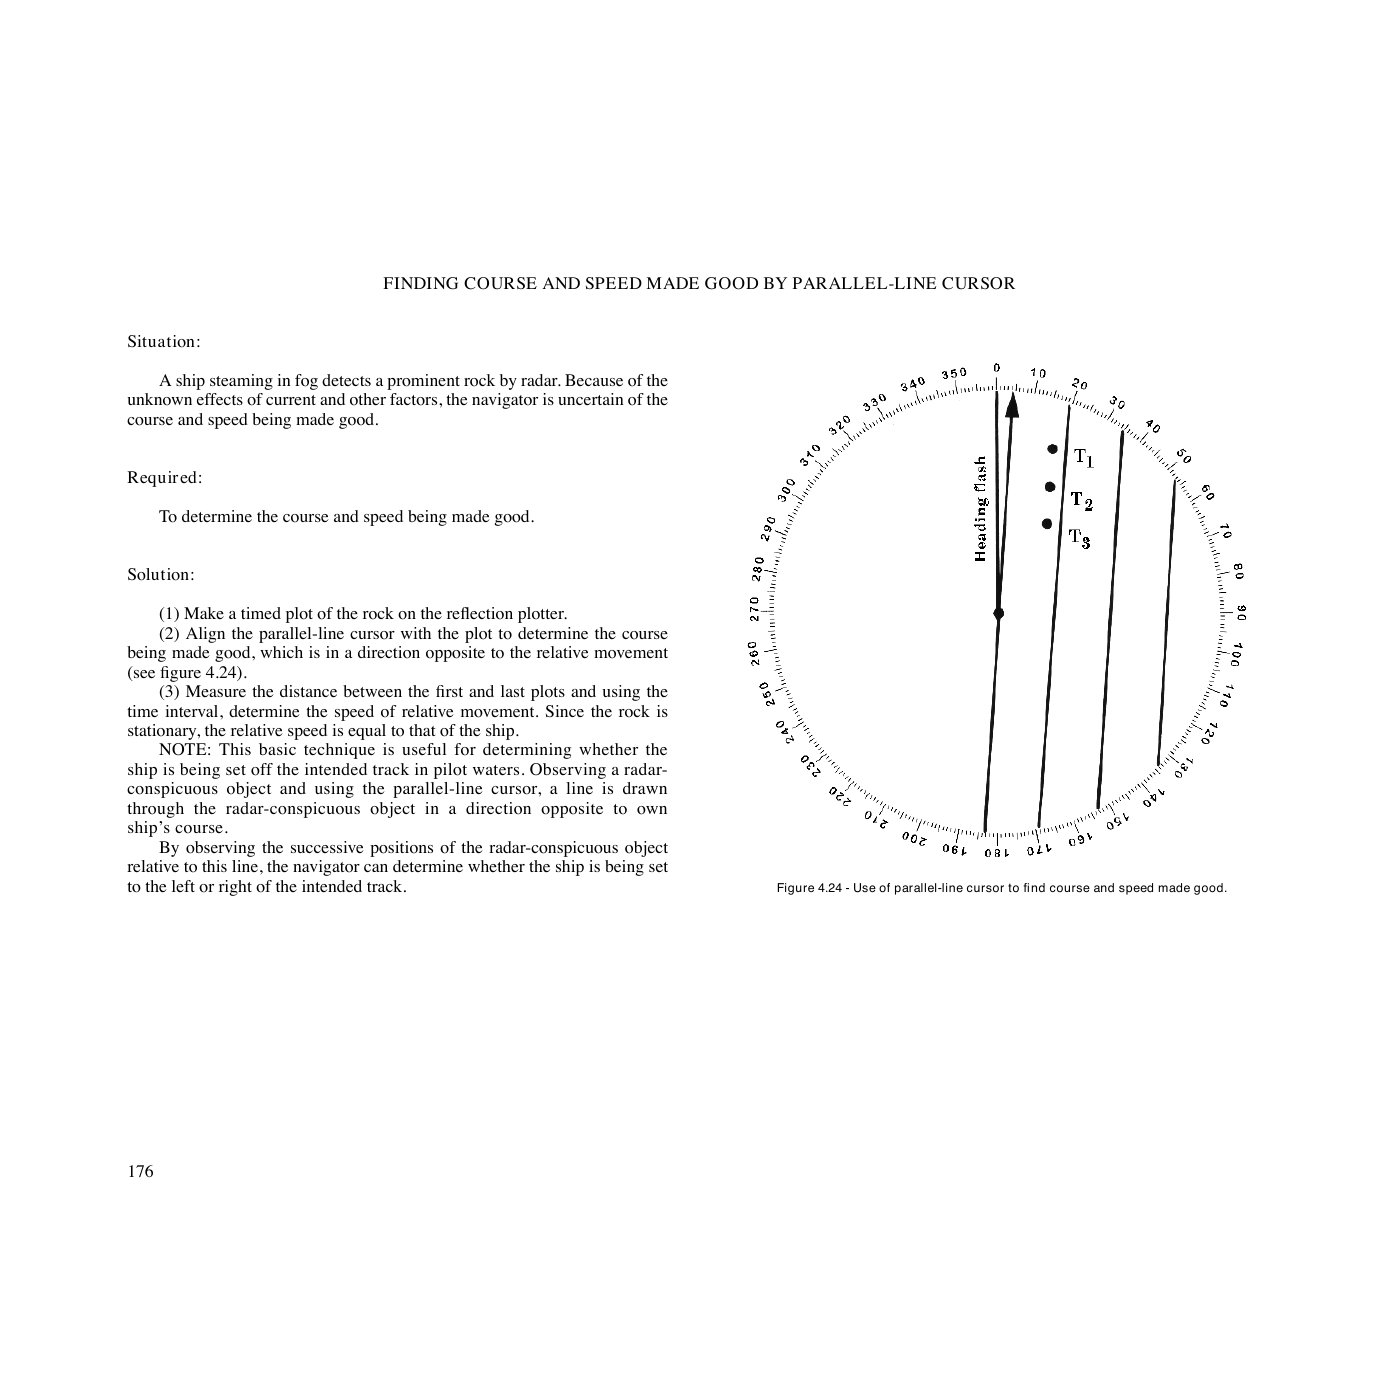
- Range and bearing to a single object. Quickest. Plot a circle of your range from the object and a line of bearing; you're at the intersection. Single-source fix — be skeptical of bearing if the target is distant or the antenna is small.
- Two or more bearings. Two bearing lines cross at your position. Three+ for a "cocked-hat" of confidence. Bearing accuracy is limited by beam width — best with three well-separated targets.
- Tangent bearings. Bearings to the edges of an island or cape, when the chart shows the feature clearly. Two tangents to the same island = two bearings = a fix. Useful when no point-targets are available.
- Two or more ranges. Range circles from two targets; you're at one of the two intersections (you almost always know which by approximate position). Range is generally more accurate than bearing at radar distances; this is the workhorse harbor-approach fix.
- Mixed methods. One range, one bearing — one circle, one line. Or one range and one tangent bearing. Use whatever you have when targets are scarce.
Pre-construct range arcs. When approaching a known waypoint, draw the range arcs you expect on the chart in advance. As soon as the radar paints the target, swing your VRM to the planned range and you have an instantaneous fix. Saves seconds in close-quarters work.
5 · The contour method
In open water, you can fix on the shape of a coastline rather than discrete targets. Lay an acetate over the chart with the same scale rings as your radar; trace the radar-painted shoreline; slide the acetate over the chart until the trace matches the actual coast contour. Where the radar center sits on the chart is your fix.
This is why some training kits include a "contour matching" exercise. Modern chart-radar overlays do this in real time — the radar picture and the chart are displayed in the same coordinate frame, and you visually verify that they agree.
6 · Approaching land — common patterns
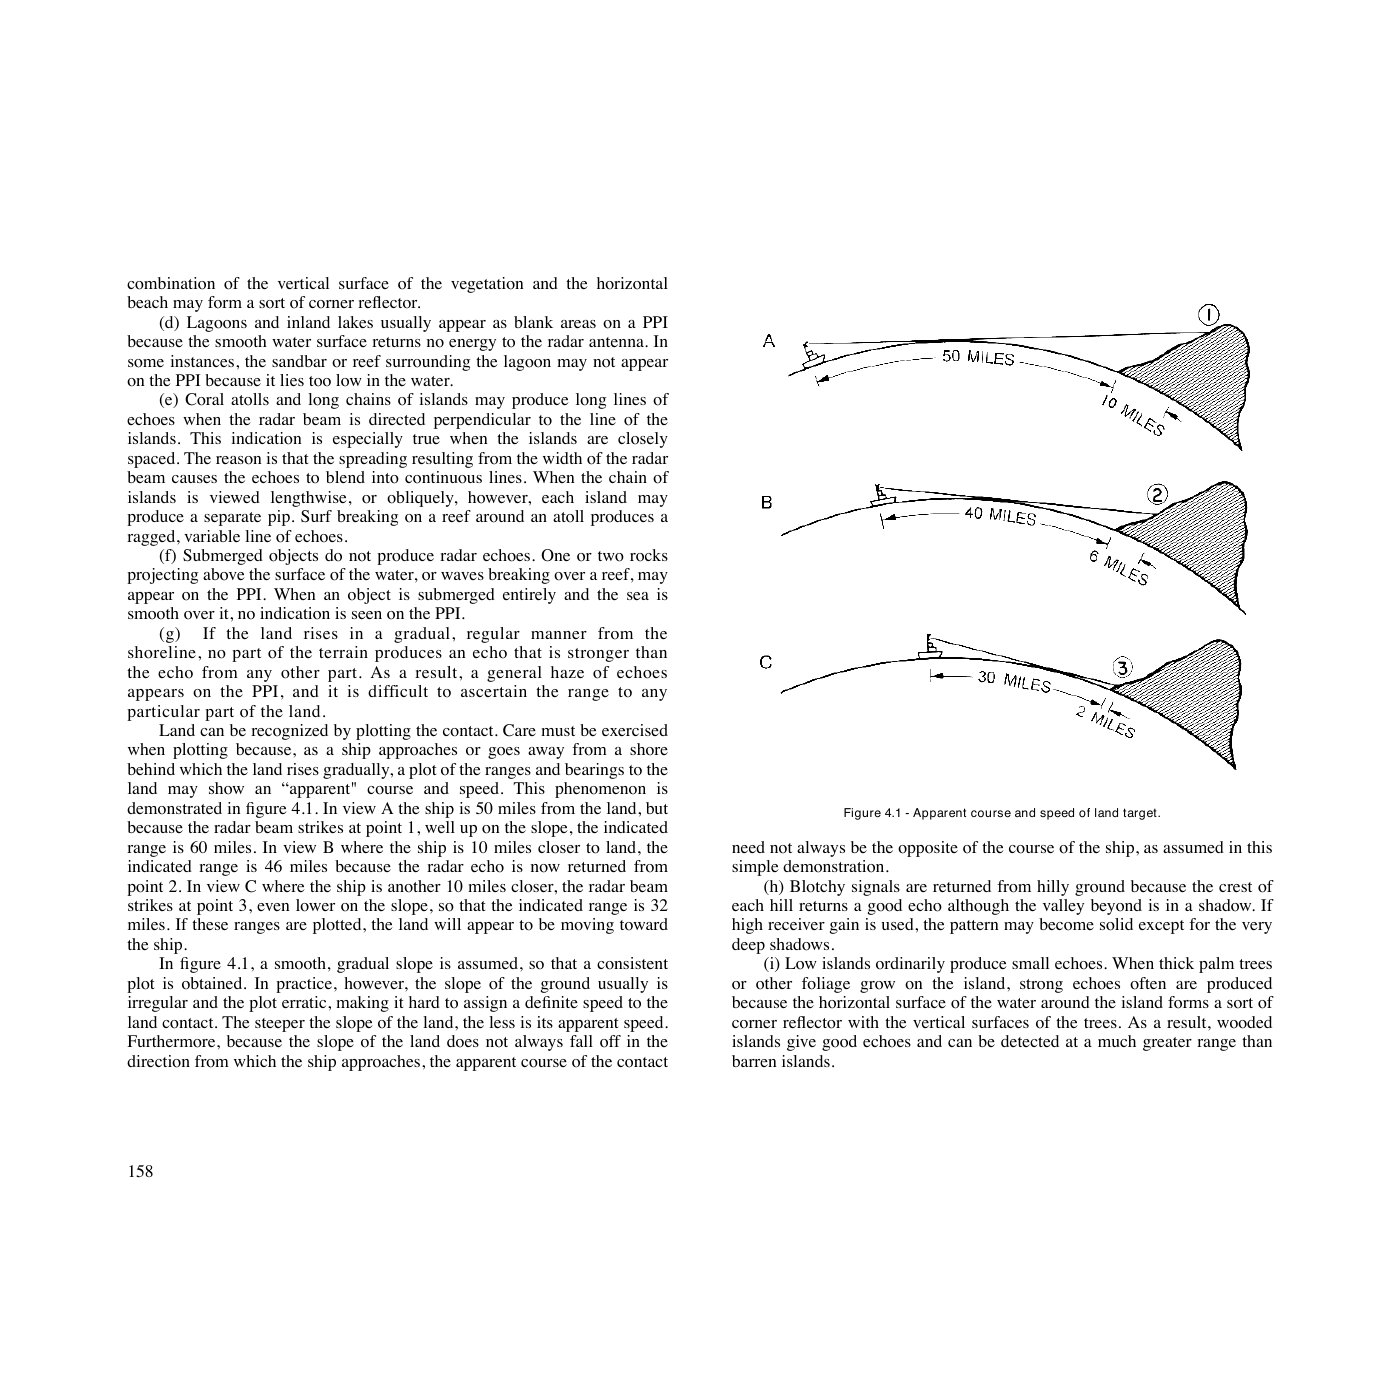
- Mountains paint first, beach paints late. The first sign of land is high terrain returning over the horizon. The actual coastline at the waterline may not appear until you're well within the radar horizon for that height. Compare what the chart shows for terrain heights along your bearing.
- Headlands paint stronger than bays. The reflective surface area is bigger and the geometry is more orthogonal to the beam. A landfall radar picture often looks like a string of "blobs" (capes and hills) with gaps between them (bays and low ground).
- Anchored vessels in a roadstead can be confused with islets. If a "small island" wasn't on the chart at the position you're seeing, suspect a ship.
- Wakes from large vessels paint behind them in heavy seas. A line of clutter trailing a target = wake, useful for confirming ship vs. fixed object.
7 · Ice
Pub 1310 has dedicated subsections on detecting ice with radar — a relevant concern for high-latitude cruising even today:
- Icebergs — tabular faces give large, well-defined echoes. Detected at significant range (typically 5–10 nm).
- Bergy bits — smaller fragments (1–5 m above water, ~10 m across). Detected at 1–2 nm depending on conditions.
- Growlers — small (under 1 m above water), barely visible. Detection range is on the order of hundreds of yards in flat water; in any swell, they vanish into clutter. Genuinely dangerous because they can sink your boat at slow speeds and won't show until very close.
Sea state hides growlers most effectively when the swell is short and steep. Ice patrols use synthetic-aperture and dual-polarization marine radars; small-craft radar in growler-infested water is more useful for course-line obstacles than for individual avoidance.
Practical takeaways
- Range first, bearing second. Range is two-to-three times more accurate at typical landfall ranges. Build your fix on ranges where you can.
- Pre-construct. Draw range arcs to your next waypoint before approaching, so a fresh paint instantly gives you a fix.
- Match the picture to the chart, then nominate the targets. In a busy paint, identify obvious features first (a charted islet, a known headland) then work outward from there.
- Don't trust a single fix at the limit of detection. Get a corroborating one from a different geometry, or wait until you're closer.